Recently i customized my Windows Mobile Rom. I got an Unlocked T-mobile MDA on my hand but didn’t liked windows Mobile 5 interface. I searched for windows mobile 6.1 upgrade for MDA but no luck from official T-mobile Website. I saw lots of questions about Updating windows mobile ROM. I found lots of ROM but wanted to build my own Junk free ROM.
At First you need to download a good Kitchen and a good ROM for windows mobile. For Kitchen I found that HyperCore Kitchen is the best choice so download the kitchen from here :

Kitchen source: HyperCore Kitchen
[box type=”download”]Working Link Hyper core Kitchen[/box]
Latest Kitchen Download: Download
You can Use this kitchen for Wizard, Hermes, Artemis, Herald, Universal, Trinity and Prophet. Then Download a Rom for your device. You can find a lots of coustomized ROM for windowsmoble devices on Xda Developers. Before Downloading a windows Mobile Rom you need to know what kind of Windows Mobile Device you Have . And You need a CID Unlocked Device. I know that my MDA is a Wizard and it’s a G3 Device. To know about your device please read Smartphone / PDA Nick Names And Unlocking. I added some Unlocking tools source for different Device. After downloading and Unlocking Your Device You can update your Rom. To coustomize your downloaded ROM follow this steps:
CREDIT GOES TO anichillus for his Tutorial and kitchen. I just modified the tutorial with some pics and steps. Hope it helps…
Extracting a ROM
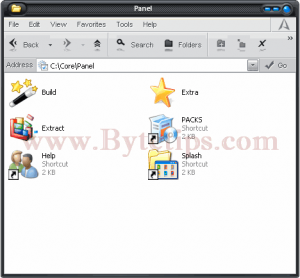
1. Extract The kitchen to your C: Drive otherwise it will not work properly. It should be C:\Core\ on you PC. First of all you need to edit the file named “Device.txt” located on the “C:\Core\ACK\” folder located on systemdrive. You will see set device= . If you have a Wizard then edit the test like this set device=Wizard. Then Go to your downloaded rom directory ans copy the nk.nbf or the .nbf file to Desktop\HyperCore\Panel\Extract\source Folder. Make sure that .nbf file is named as nk.nbf.
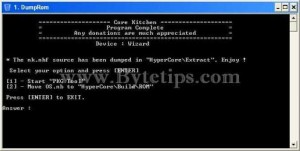
2. The Navigate to Desktop\HyperCore\Panel\Extract folder and Start DumpRom and hit Enter to Dump / Extract the ROM from nk.nbf file. You will see its working.. After few seconds..minutes, depending on your PC and the ROM you are extracting you will be prompted with a Status and with some questions. Here you can start PKG Tool and you can move the OS.nb to ROM folder. Take a look at the bottom picture :

Type In 2 and hit Enter to copy Os.nb. Now Type in 1 and hit [ENTER] to start Package Tool. Read the window and Hit [ENTER] to continue…
Bulding Packages
3. You will see some options On the status window. Choose Number 3 manual Option. So type in 3 and hit [ENTER].. Package tool will start. Click on Package tool and go to file > Open then select the folder Desktop\HyperCore\Extract\dump. It will show you Rom Information. After that click on Tools > Build Packages on the package Tool program. It will take some time to bulid the package. It will show you some status afet building packages.Look for [Missing Files] to find info about their Directory. To copy the missing file go to Desktop\HyperCore\Extract\dump directory and Copy the missing files / folders from there to where it shows. After you placed all files where they should be, you must then rename the “dump” folder into “Packages” and only then you can exit the PackageTool. . When you will do that, the batch program will get you to another Status window. Here you can see “Move SYS and OEM to Kitchen. So, select “4” and press [ENTER] but be sure that you renamed the “Dump” folder first into “Packages”. Then type Y and press [ENTER] again. It will move the SYS and OEM folders into HyperCore \Build for later building. Then Exit or Press [ENTER] to Exit the status window.
Dumping XIP from ROM
4. The Only thing you miss now is the XIP section and you’ll have your first OEM and SYS Kitchen after dumping the XIP from the ROM. Go to Desktop \HyperCore\Panel\Extract and start DUMP XIP it will open a folder asking you to place OS.nb on that folder. We already moved the OS.nb to this folder. So Close that folder and hit [ENTER]. This will work to generate the XIP. Read the status window and continue. Type in 1 and press [ENTER] to move the XIP. Press any key to continue and Exit the Status window.
BuilDng ROM from Kitchen
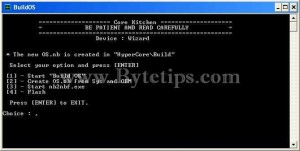
5. If you are on this step, you made your own first kitchen for your windows mobile device. Before building any windows mobile rom you must remember that your ROM size should be 57 MB. Now go to Desktop \HyperCore\Build and add / delete your OEM Pcakages from OEM Folder. If you want to know about how to make OEM package for Windows Mobile please read details about Making Windows Mobile OEM Here. Add remove packages from OEM and SYS folder to adjust the nk.nbf size. After adding an deleting packages go to Desktop\HyperCore\Panel\Build and start BuildOS. Look at the picture below to see this status window.
6. This will prompt you with couple of choices. It’s pretty easy. Select “1” and this will start the actual BuildOS program. Select the Packages from there and click on little green arrow and wait until finish. Note that, If you have duplicate file on the packages you will get error message saying file exist.. delete duplicate files from SYS and OEM then click on green button again. When done close the build os on the status window to make OS.nb file by choosing option 2. Type in 2 and press [ENTER] to create OS.nb file.
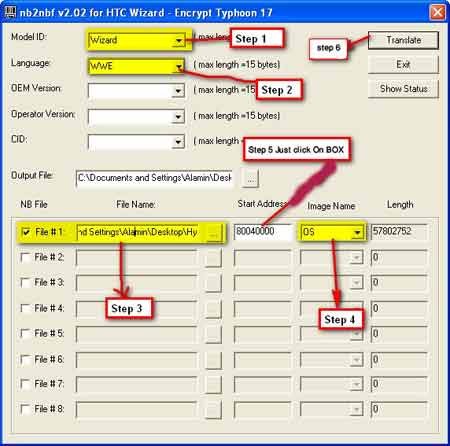
7. After finishing you will see the status window again. Now type in 3 and it will start nb2nbf tool. Now follow this instruction carefully.
- Select Wizard on model ID field.
- Then select File#1 and browse Os.nb file from Desktop \ HyperCore \Tools\Convert\ .
- Then select OS from drop down list.
- Click on Start Address field to get the Start address.
- Click on Translate to buld nk.nbf file. Here is a picture of nb2nbf tool with this steps .
Go to Desktop\HyperCore\Tools\Convert and copy your coustomized nk.nbf file flash that file to your device and You are done. Have fun …


You need .Net Framework 2.0 To do this !
But it’s a Great Tut !
10/10 =D
This is a very good tutorial, simple to understand and follow. Thank you for the efforts spent.
Well, I did as per the steps mentioned above and I’m stuck in step3. I got a list of missing files. But where do I get these missing files from? Please can you explain?
“To copy the missing file go to Desktop\HyperCore\Extract\dump directory and Copy the missing files / folders from there to where it shows”
– Isn’t dump the very folder we are working in? So how can I find the missing files there?
Please help. I’m really desperate to cook my own clean ROM from all those jazzy ones out there, which I’m not much a fan of.
I am glad you liked the tutorial.. build the package after dumping the rom. Then go to Dump folder (after building package), you will see files and folders.. the missing file list will show you .. where to put the files.. ( SYS , OEM ) I hope this will help ..
Hi,
Great post..
Will this work for WM 6.5?? What has to be changed for this kitchen so as to create 6.5 ROMs?
And btw, I am using a HTC Tornado. So what should I change in the above process?
Thanks..
Hi,
Great effort 🙂
I want to know what modifications are to be done for cooking 6.5 ROMs.
Sorry to sat that, I didn’t tried it on a windows Mobile 6.5 ROM. But i saw some tools and tutorials to modify windows mobile 6.5 ROM.
Hello!
Both , The tutorial & the software , were of great help. Thanks
a lot for the post. 🙂
I’m glad this helped you….
Dear Jim,
Could you give me explained for dump,Extract and build for HTC Atom please…
Thanks in advance
Jima
will this wrk 4 asus p320 roms